Settings (Windows App Version)
Customize the look and feel of the Audience Display via the configuration panel. Settings are specific to each instance. Access the settings by clicking on the Audience Display hover menu and clicking the first icon, or use the keyboard shortcut CTRL-SHIFT-C when the Audience Display program is in focus.
General Settings
To close the settings panel at any time, click the “Save and Close” button on the top middle of the settings display.


[Resolution] The Audience Display is available in 1280x720 (“720”) or 1920x1080 (“1080”) resolutions. Ask your event production crew for more information.
[Check for Updates] Query FMS to see if an updated version is available. If so, a prompt will be presented.

After the update downloads and installs (which is automatic) the Audience Display will need to be re-launched manually using the appropriate shortcut.
Graphics Settings
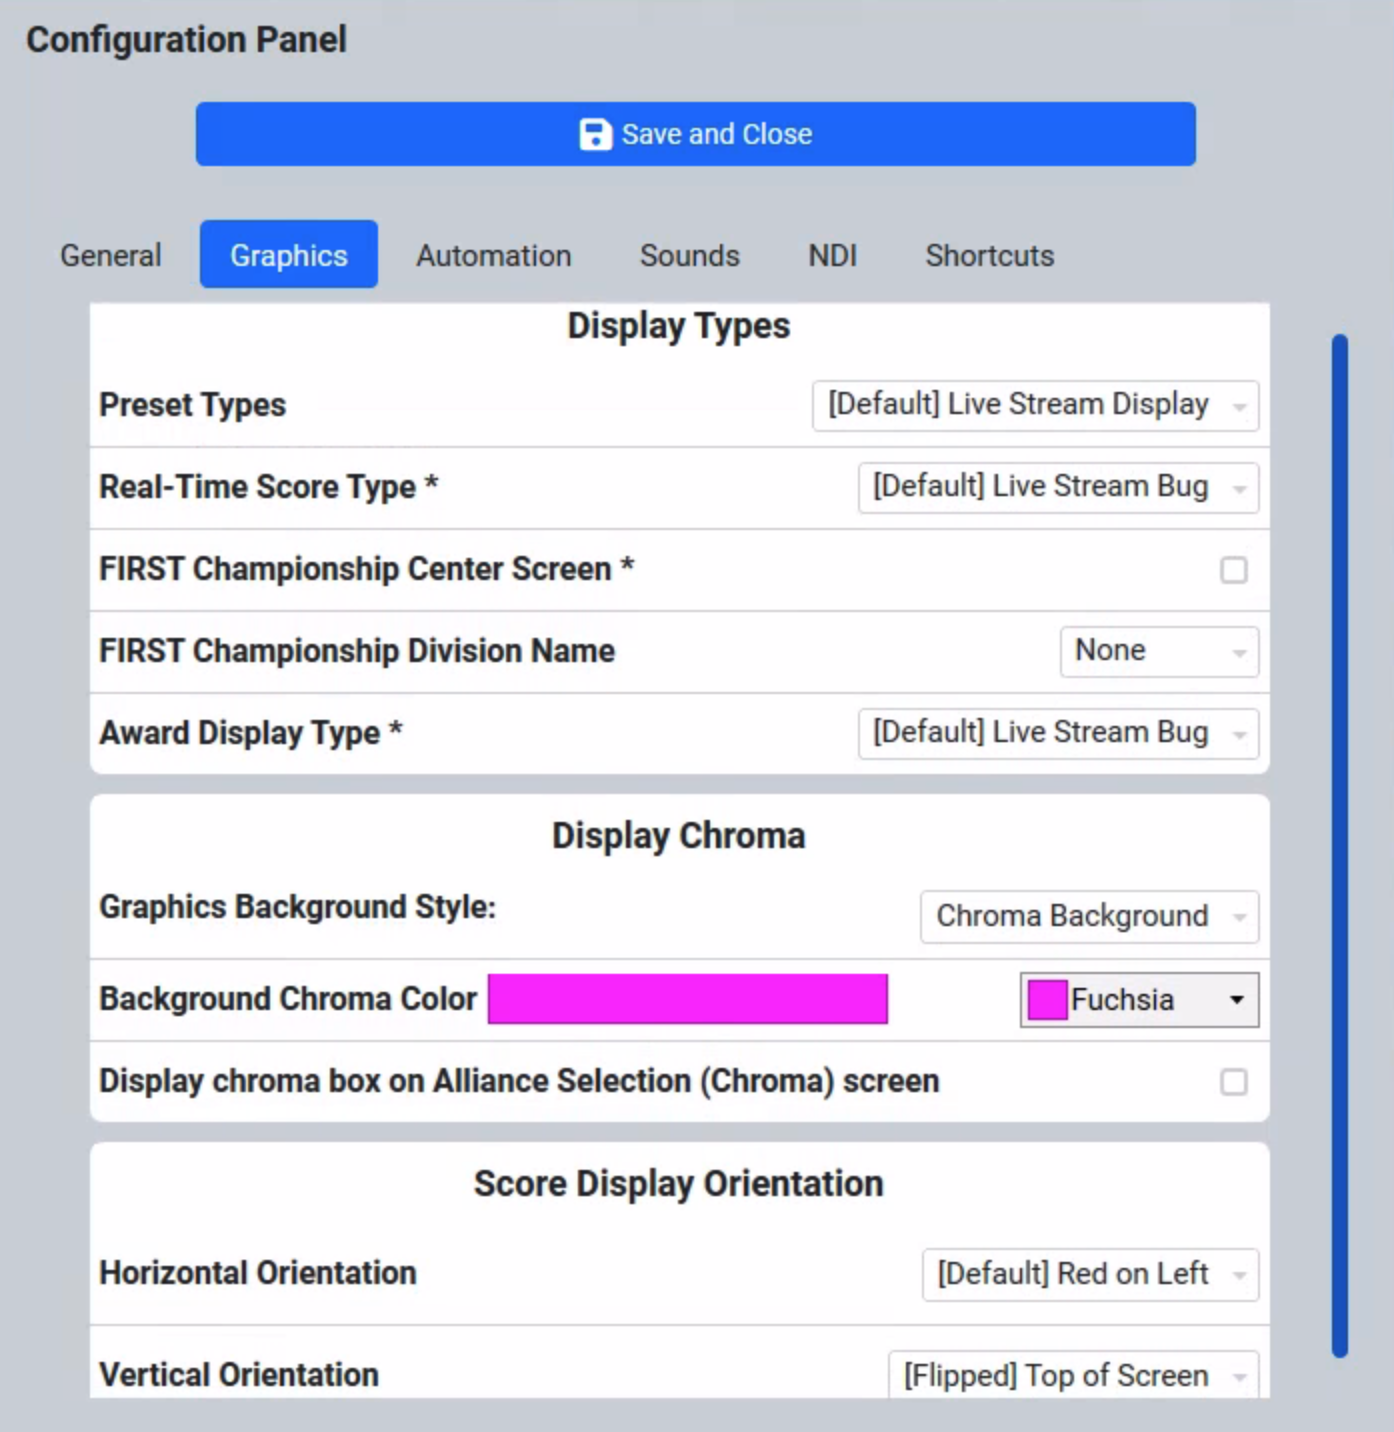
Display Types:
Note
Careful consideration should be used before changing these options as they can cause confusion for audience members who expect a traditional layout from year to year. For official FRC Events, if in doubt, contact your Engineering support contact.
[Preset Types]
Main In-House Display - Default singleton operation
Live Stream Display (default) - Load the default settings for Audience Display instances being used on FIRST Webcast Units
Champ Center Display - For use by FIRST HQ at FIRST Championship
Custom Settings - Individually specified user settings
[Real-Time Score Types]
Live Stream Bug (default) - Webcast versions as arranged with FIRST HQ and provides an alternate view of the data in a more compact, centered display
Full Width - The traditional score bar that takes up the full bottom third or so of the Audience Display
[FIRST Championship Center Screen and Division Name] Configuration options specific to the FIRST Championship. Please do not adjust these settings at any events except under the direction of FRC Support.
[Award Display Type]
Live Stream Bug (default) - Show award names and award winners in a simplified web friendly display on top of the camera view
Fullscreen - Show award names and award winners full screen without space for chroma (camera shots)
Display Chroma:
[Graphics Background Style]
Chroma Background - Show the selected color in the area to be keyed (or cut) out and replaced with live event video from a camera or production feed. The actually “keying” process and mixing of video would need to be done through external software, not through FMS/Audience Display.
Ranking Display - Removes the background screen color (Chroma) and shows a ranking screen in its place. The list automatically scrolls through all the ranked teams at the event, in rank order. Teams must have played one or more qualification matches to be included in the listings.
Note
Updates to the qualification rankings via out-of-band processes (such as Match Review) will not update the rankings if the rankings are on screen during the update process; to update rankings, the Video Switch must be used to select another view (such as “Background”) and then reload the desired view (“Video Only” or “Video and Score”).During Playoff matches, the rankings are replaced with the playoff bracket to show progression through the tournament.
[Background Chroma Color] Select the color to be used for the Chroma Key (if in Chroma mode). In most cases, the deault “Fuchsia” should work great. The desired color will be dictated by the event’s production group. RGBA and Hex values are both accepted.
[Display Chroma Box on Alliance Selection Screen] Select the color to be used for the Chroma Key (if in Chroma mode). In most cases, the deault “Fuchsia” should work great. The desired color will be dictated by the event’s production group. RGBA and Hex values are both accepted.

Warning
Avoid using common colors like “red” or “blue” as Chroma Key colors, as they will also cause portions of the other graphics (like the FIRST logo) to be keyed out.
Real-Time Display:
Note
Careful consideration should be used before changing these options as they can cause confusion for audience members who expect a traditional layout from year to year. For official FRC Events, if in doubt, contact your Engineering support contact.

[Real-Time Score Vertical] Move the real time score display to the bottom of the screen or to the top of the screen based on venue needs.
Automation Settings
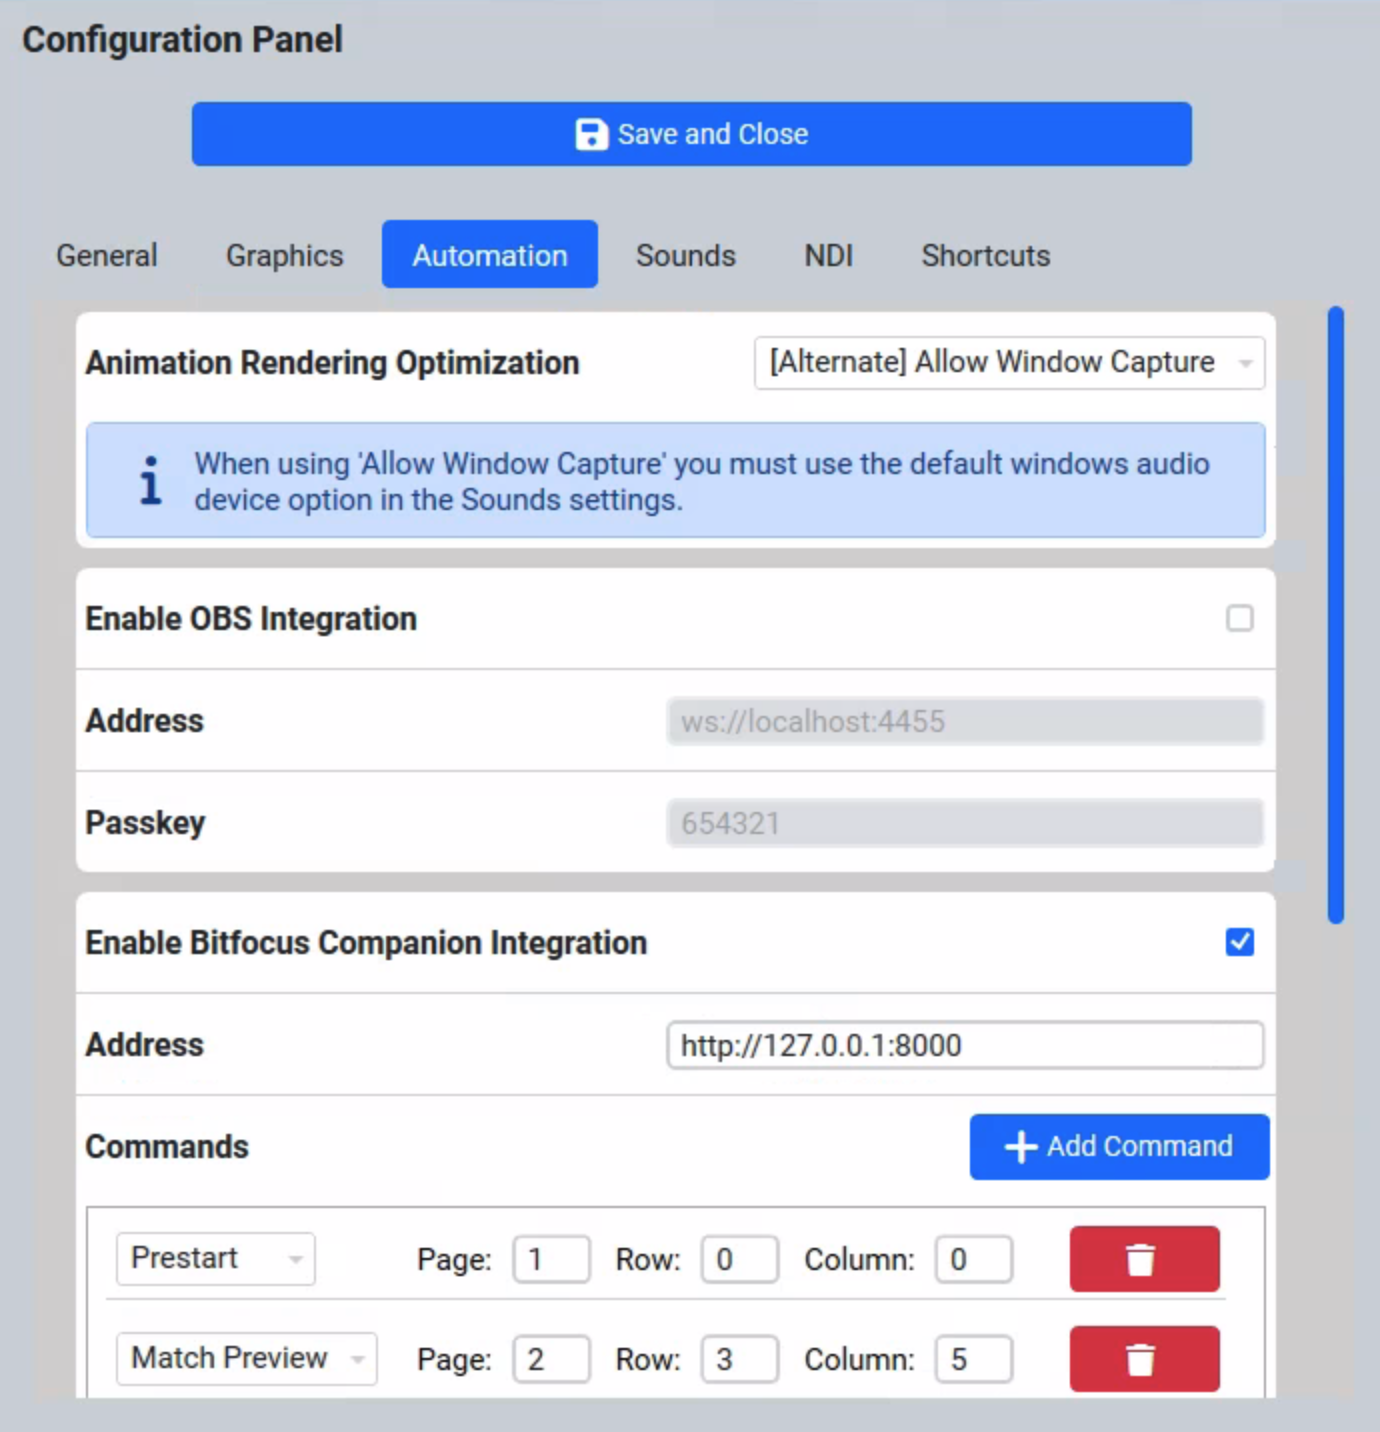
Warning
If using the Minimal CPU option and using vMix or OBS to capture the Audience Display window, the animations will not capture in vMix or OBS.
[Enable OBS Integration] Instruct the Audience Display to issue commands that can be detected by OBS (a broadcast software). For more information see this article
[Enable BitFocus Integration] Instruct the Audience Display to issue commands that can be detected by BitFocus (an A/V and production ). For more information see this article
Sound Settings
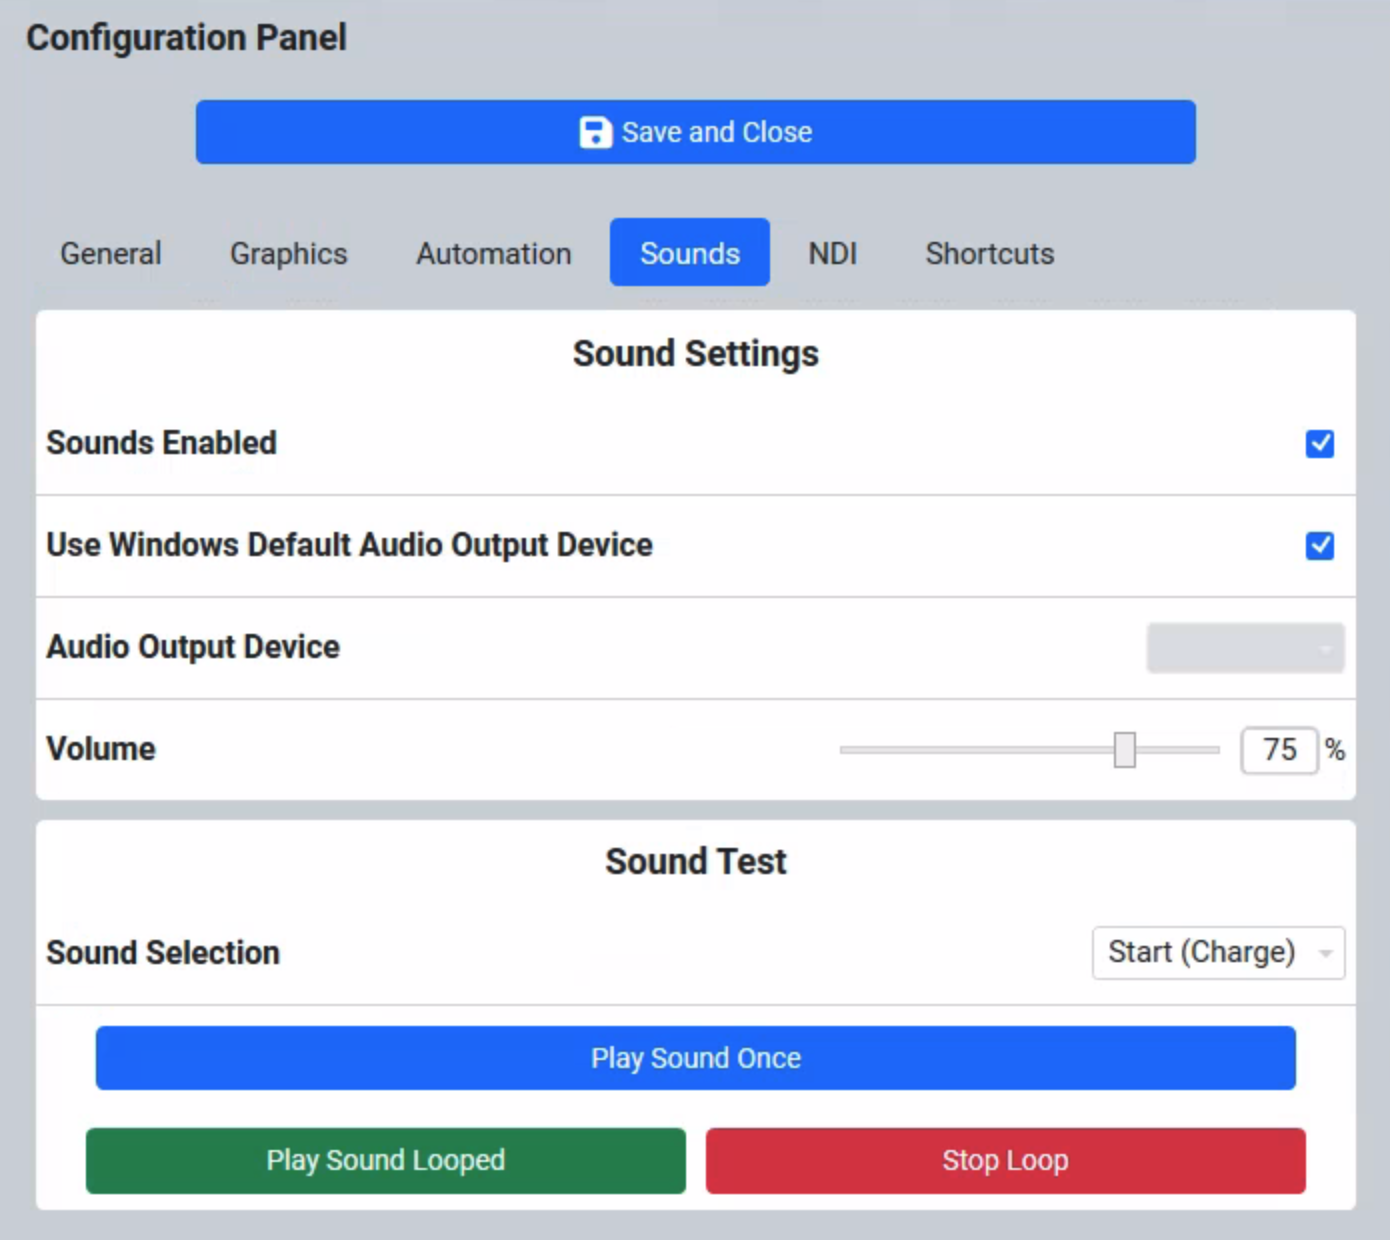
[Play Once] Single play of the selected sound
[Play/Stop Looped] Start or stop playing the sound until the opposite button is clicked. Particularly helpful
NDI ® Settings

NDI Settings are for advanced users and are described in more detail within the software itself (in the corresponding blue boxes).
Shortcuts
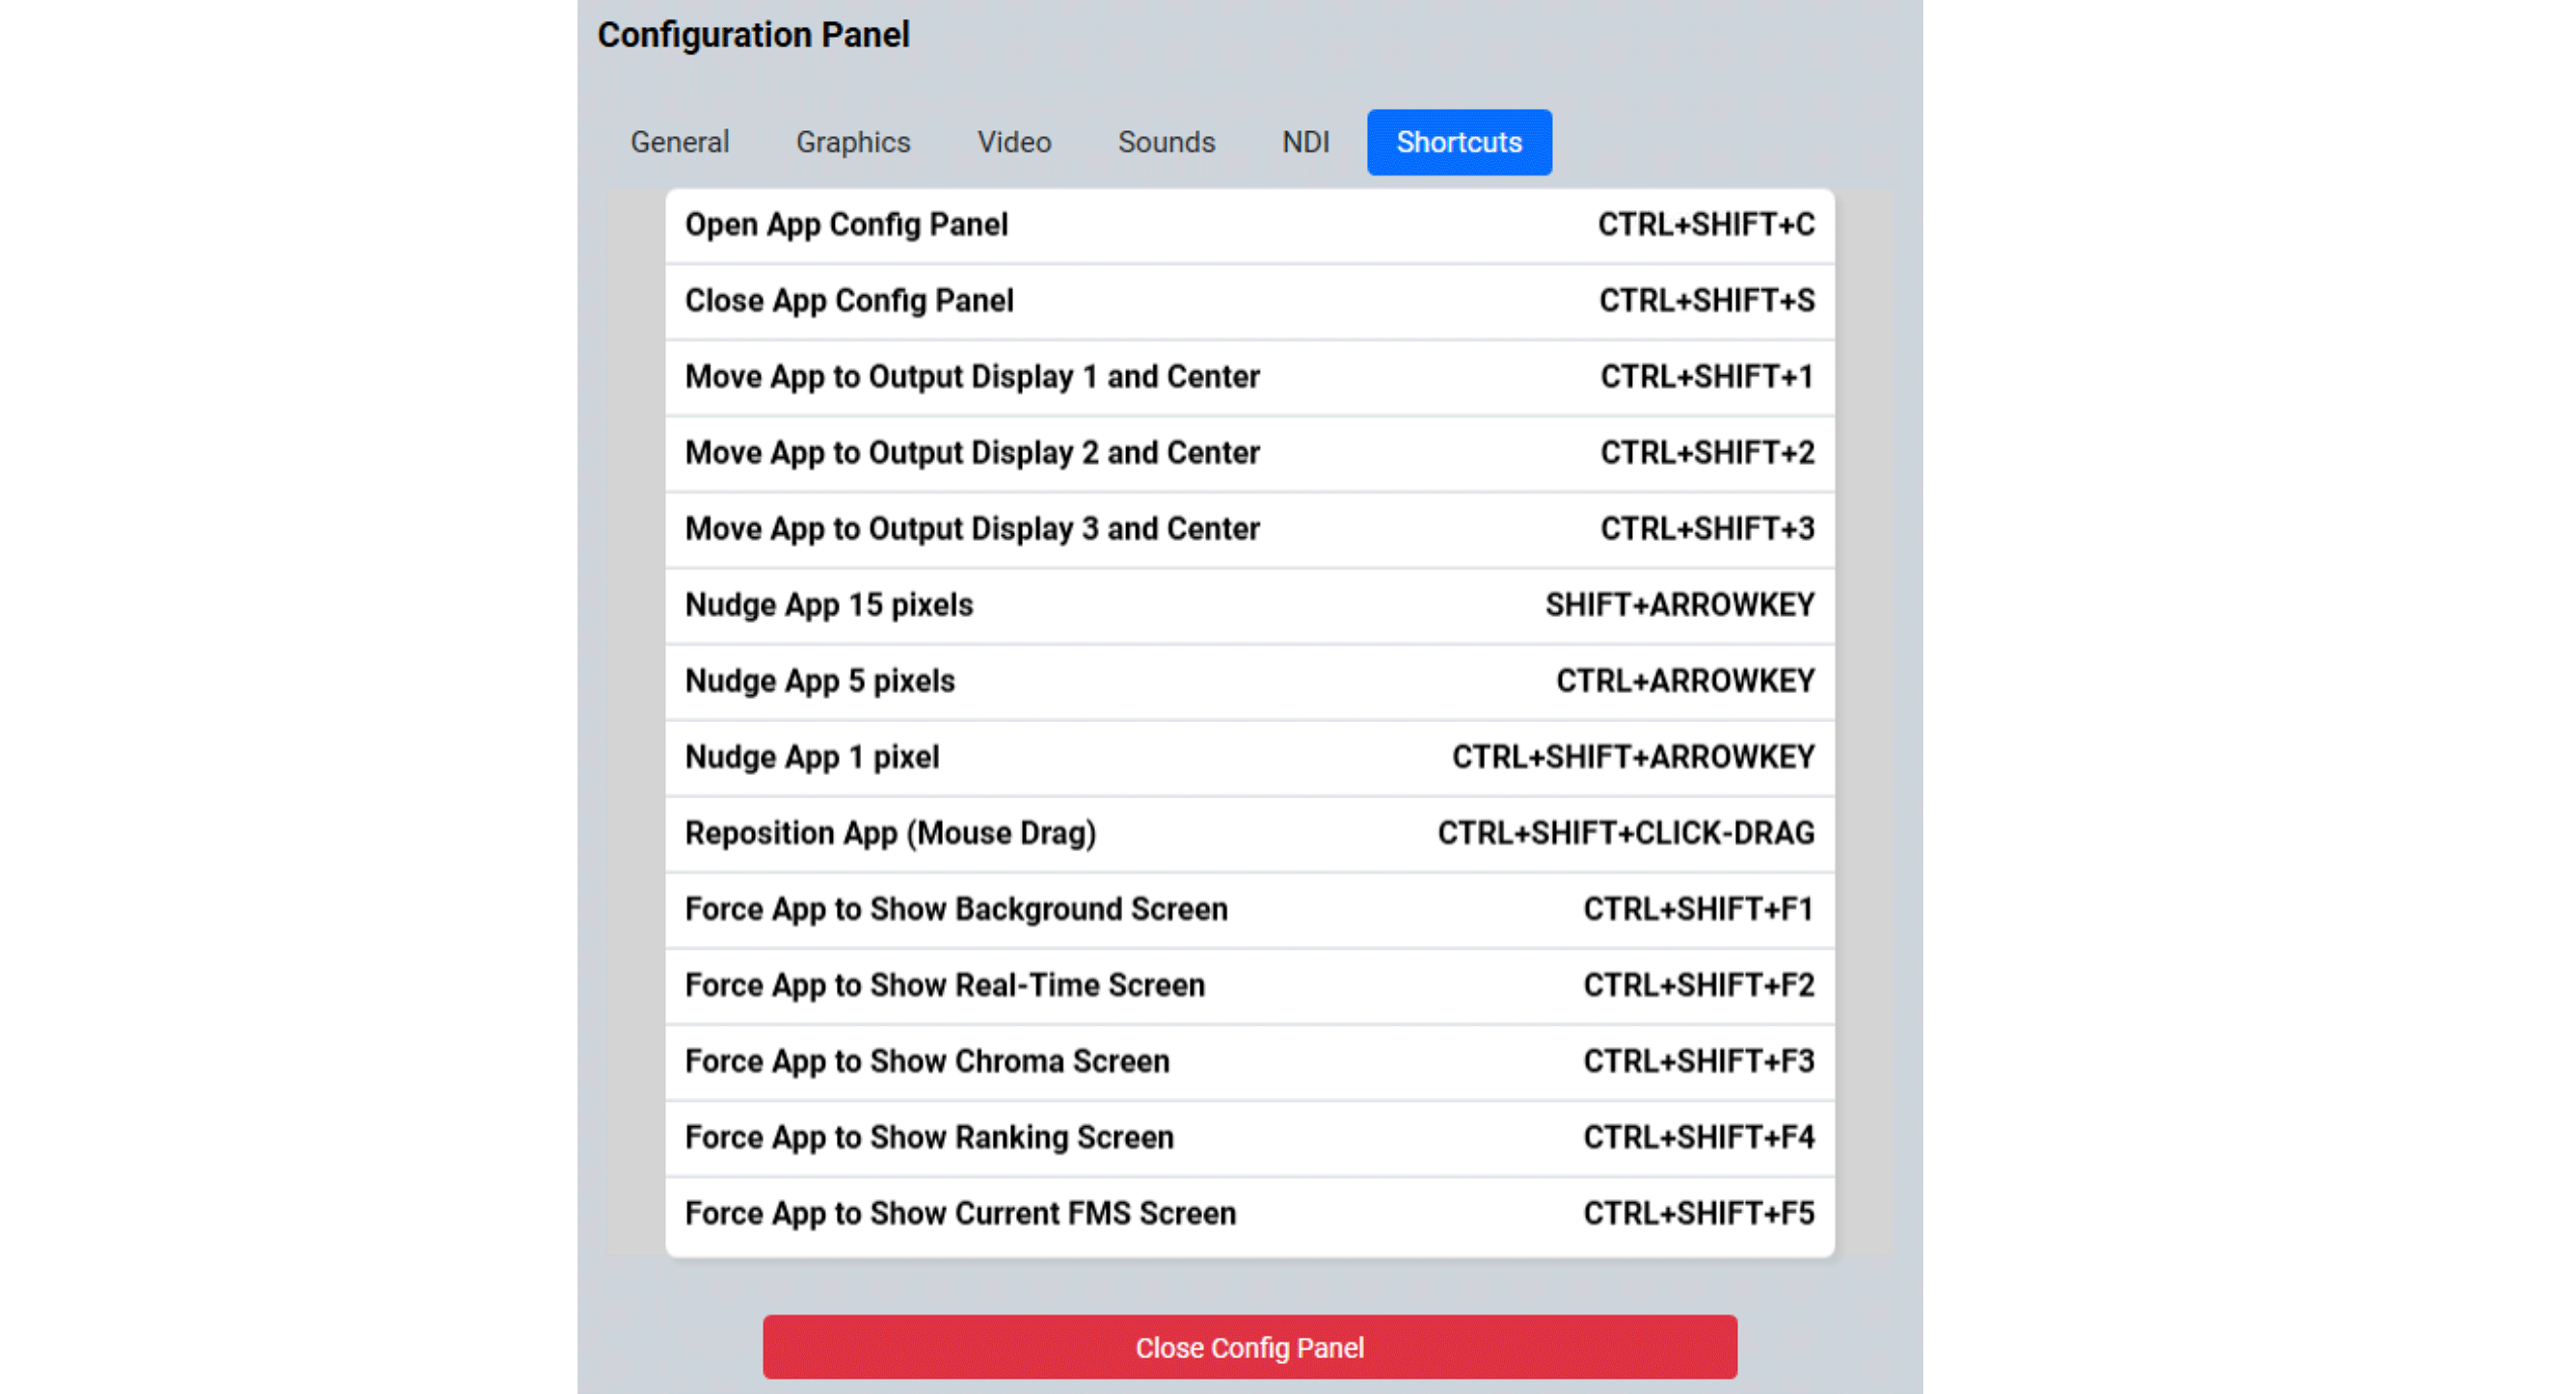
Quick reference of the available shortcuts and actions in the Audience Display.
Resolution and Positioning
[Positioning] To quickly position the Audience Display on the monitor, click the “Center on Screen” button from the right-click menu of the taskbar. the placement on the screen. Alternatively, hold CTRL-SHIFT and CLICK-DRAG the mouse on the window to drag the window around.
To precisely position the Audience Display on the monitor, use CTRL-ARROW, SHIFT-ARROW, or CTRL-SHIFT-ARROW to move the display in the direction of the arrow. Each subsequent modifier (CTRL, SHIFT, CTRL-SHIFT) adjusts the display in the direction of the arrow key pressed a different incremental amount.
To precisely throw the audience display to another screen (centered) in one keystroke, use the CTRL-SHIFT-1, CTRL-SHIFT-2, and CTRL-SHIFT-3 keyboard shortcuts. These shortcuts will throw the Audience Display to Display 1, Display 2, and Display 3 as defined by Windows, respectively, and centered within the display.